
Shutter Views
Shutters Views provide a way to customize the view of the Time Traveller and search interfaces. They allow you to create different slices of your data based on the needs of the people viewing it.
Shutter Views allow you to create a simplified subset of your identity data. This can be used to create task specific interfaces, or to provide a useful subset of your data to people who would be overwhelmed by the entire set of data silos and attributes.
Settings
Although Shutter Views provide a reduced and simplified view of your data, but they are NOT a security feature.
Identity Panel security roles allow you to restrict access to attributes, and attribute level security is implemented at the lowest layers of the product architecture. Conversely, Shutter Views operate solely at the user interface level, and do not restrict what data passes through the JSON API.
Although they are not intended to operate as a security feature, it is possible to use Security Roles to assign default Shutter Views to groups of users. This makes it easy to assign interface views to people based on their group membership without needing to be concerned with distributing modified URLs.
Custom Shutter Views are created in the Settings interface. There is no limit on how many shutter views you create.
Each shutter view must have a unique name. This view name will be converted to a URL slug that will be added to every link when a shutter view is active. For example, when "Office 365" is active, all links will have a view parameter "view=office-365": https://identitypanel.com/object/7da69126-4b7f-4d0f-a0db-78013df840a9&view=office-365
Default Views
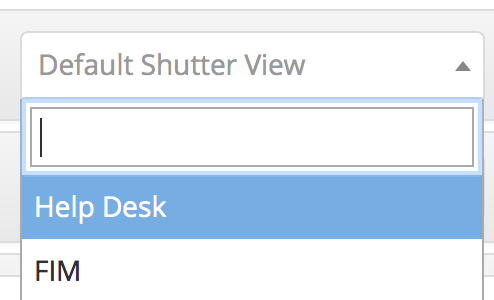
Once a Shutter view has been created, it will appear in the "Default Shutter View" drop-down list in Role Settings. When a user navigates to the Panel platform, their role membership is iterated in order, and if one of their roles has a default shutter, then the user will be automatically redirected to the URL namespace for that shutter view. If a user has a default shutter view assigned, they may press the shutter view toggle icon in the Time Traveller switch over to the full view.
Silo Mode
A shutter can limit what silos get displayed in the Time Traveller and Search interfaces. There are three modes:
- Show All: all silos will be displayed
- Show Selected: only silos explicitly included in the shutter view will be displayed
- Remove Selected: Silos itemized in the shutter view will be hidden.
In most scenarios you should create shutter views with the "Show Selected" Silo Mode.
Show History
The Show history checkbox determines whether or not users will see the date navigation header menu in the Time Traveller interface. If this option is de-selected then users will only see the most recent state of objects in the Time Traveller.
Silo Settings
Each Silo has several settings to control how it is displayed.
Attribute Mode
As with silo mode, attribute mode may be set to Show All, Show Selected, or Remove Selected. When Show/Remove Selected is chosen, use the multi-select box to choose which attributes to hide or show.
Silo Name Override
It is also possible to override the name of a silo. The name override takes precedence over both the silo name, and localization settings. Silo name overrides can be used to give appropriate non-technical names. For example, Office 365: Exchange might be renamed to Cloud Email.
Attribute Names
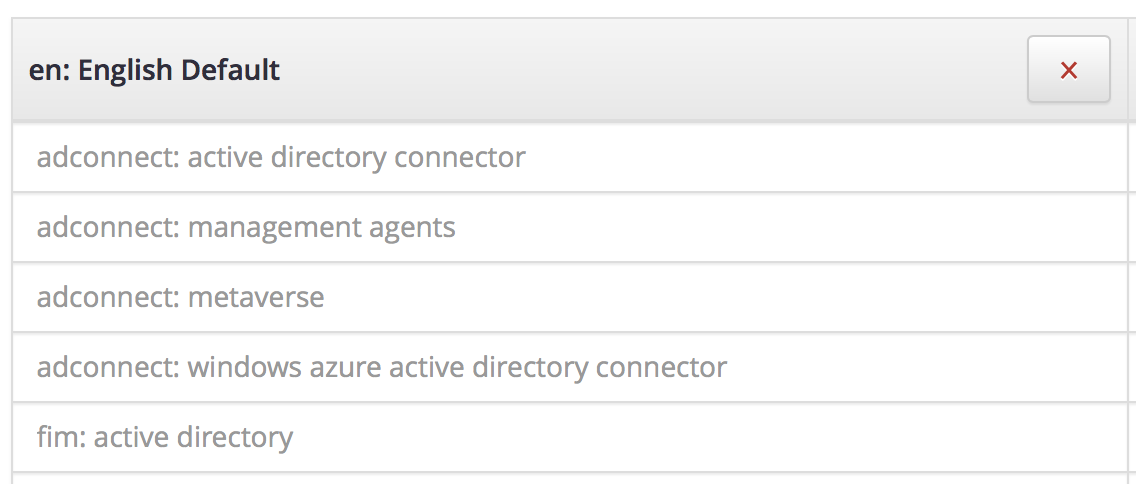
The attribute naming interface allows standardized and localized names to be provided for data silos, as well as individual attributes. Attribute names are entered in the settings interface, and then applied across the Panel platform, including in the Time Traveller, Advanced Search, and Reports.
Attribute Naming has its own tab in the settings interface. Attribute Naming may be enabled or disabled as a whole, and attribute names may be provided for any UI culture supported by Windows.
To add a new language localization, simply select it from the drop-down list and click the Add button.
The table of attributes displays Silo names at the top, followed by attribute names across all silos, which are sorted alphabetically.
The attribute naming interface is not case-sensitive, so 'firstName' and 'FIRSTNAME' will appear as a single attribute name. Each name cell shows the underlying system name in grey. When a custom name is added the cell will show that attribute in black.
After editing attribute mappings, simply save the settings and refresh the page.
Comments
0 comments
Please sign in to leave a comment.